- • iMovie tutorials
- 1. iMovie alternatives
- 1.1 iMovie Alternatives for Windows
- 1.2 iMovie Alternatives for Mac
- 2. Basic editing tips for iMovie
- 2.1 How to join clips in iMovie
- 2.2 How to crop/rotate photo/videos in iMovie
- 2.3 How to add voiceover in iMovie
- 2.4 How to correct color in iMovie
- 2.5 How to add background music in iMovie
- 3. Advenced editing tips for iMovie
- See more
How to Use Video Color Correction in iMovie
Jan 04,2019• Proven solutions
The cameras are more and more popular in our daily life, especially when you travel to some places. Today the cameras make it very easy for you to get some good quality videos and photos. But sometimes, the auto focus camera may misread the brightness or balance of the environment and your work get a not good-looking or natural color. At this time, you want to correct the color of your photo or video to get true colors under different lighting conditions and boost weak colors.
Looking for some professional video editing software? Check how to choose the Right Color Grading Software Tools
You may also like: How to Color Correction in Final Cut Pro >>
Part 1: An easier way correct movie color in Mac

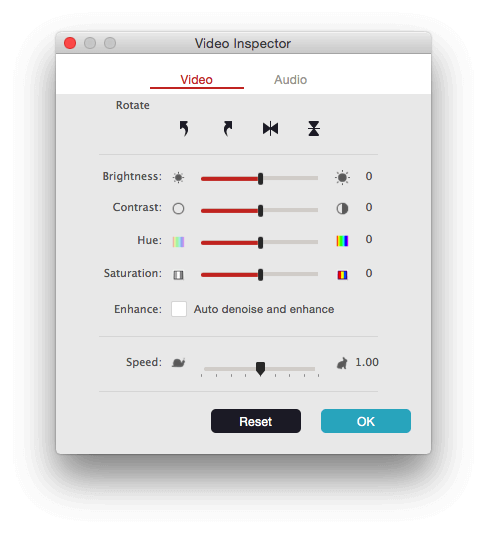
To help you easily adjust colors, Wondershare Filmora for Mac(Originally Wondershare Video Editor for Mac) can be a good choice. All you have to do is drag-n-drop your videos to the program, double click it and then adjust the Brightness, Contrast, Saturation and Hue. Besides, you can also use it to crop, split, rotate, merge, adjust audio and add lots of cool video effects as you like. Now just download it and explore the endless editing features it provides! Learn more >>

Step 1. Import your media files
Go to File > Import Media or just drag and drop your videos from iTunes library, Photo Booth, etc. You can also use the capture device or the built-in iSight to capture video.

Step 2. Correct the video color
Place the video onto the timeline and double click it. In the pop up Video Inspector, you can easily adjust brightness, contrast, saturation and hue of your video. There'll be real-time preview result shown in the right. If the you're happy with the effect, hit "OK" to confirm your settings.

Step 3. Save or share your video
When everything is OK, hit "Export" to save or share your video. You can either directly share your works to Facebook or YouTube or save to local disk and mobile devices. What's more, you can also burn to DVD.
Part 2: How to correct movie color in iMovie

Step 1. Turn on Advanced Tools
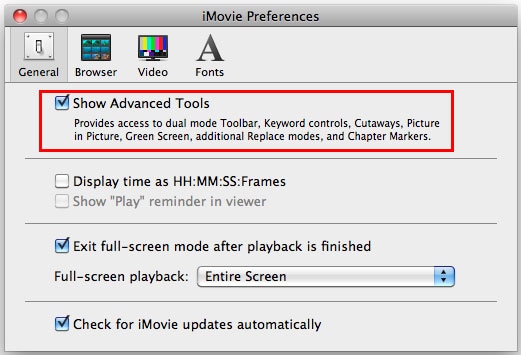
To use iMovie color correction, you must turn on Advanced Tools. You can do this by going to iMovie Preferences > General, and then you will see a window as below. Select "Show Advanced Tools" to turn iMovie color correction on..

Step 2. Open the Video Inspection
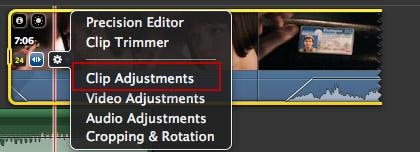
Go to File> Import > Movies and select videos from your computer to add the video to iMovie. Open the video Inspection by double click it or hit the gear in front of the video clip and select "Clip Adjustments".

Step 3. Begin to correct video color in iMovie
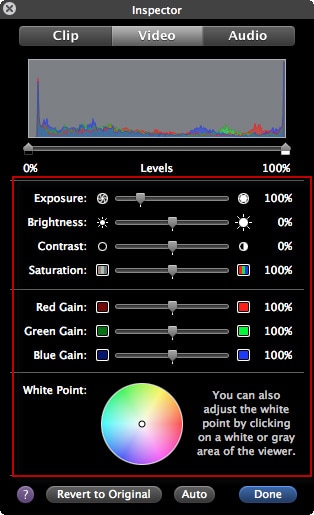
In the Inspector, choose "Video" tab and in the following window, you can change and correct video color as you like. Here you can adjust the exposure, brightness, contrast, saturation, red gain, green gain, blue gain and white point. You can real-time preview the effect in the viewing window. When you are satisfied with the effect, hit "Done" to save and finish the video color correction in iMovie.
Learn more: Color Correction and Color Grading in Post Video Creation
Related: How to Add Video Effects in iMovie
Bring up your video to a professional level with straightforward tools.
Try It Free Try It Free


Liza Brown
chief Editor
0 Comment(s)